Ah, Okonomiyaki! Just saying the name makes my mouth water. This savory Japanese pancake is truly a delight, and it has a special place in my heart (and my kitchen!). Growing up, I remember family dinners where we gathered around the table, sizzling pancakes in front of us, each one personalized to our individual tastes. That’s the beauty of Okonomiyaki – it literally means “grilled as you like it,” allowing everyone to choose their preferred toppings and fillings. From crunchy cabbage to crispy bacon or even shrimp, the possibilities are endless! This dish is not just about satisfying hunger; it’s about creativity and connection. With its roots in Osaka, Okonomiyaki has become a beloved comfort food across Japan and beyond. I love how it brings people together, whether it’s a casual weeknight dinner or a festive gathering. So, roll up your sleeves and get ready to make some delicious memories with this warm, flavorful pancake that you can customize to your heart’s content!
Ingredients
- 2 cups all-purpose flour
- 1 1/2 cups dashi or water
- 2 large eggs
- 2 cups finely shredded cabbage
- 1/2 cup chopped green onions
- 1/2 cup cooked and chopped bacon or pork
- Okonomiyaki sauce
- Japanese mayo
- Bonito flakes
- Nori flakes
How to Prepare Okonomiyaki
Now that we’ve got our ingredients ready, let’s dive into the fun part—making Okonomiyaki! I promise it’s easier than it looks, and you’ll be flipping pancakes like a pro in no time. Just follow these steps, and you’ll have a delicious, savory pancake that’s sure to impress!
Step-by-Step Instructions
- Start by grabbing a large mixing bowl. Add the 2 cups of all-purpose flour and slowly pour in 1 1/2 cups of dashi or water. Whisk it together until it’s nice and smooth. You want a batter that’s thick but still pourable—think pancake batter consistency.
- Next, crack in the 2 large eggs. Give it a good whisk until everything is combined. Now, it’s time to fold in the fun stuff! Add the 2 cups of finely shredded cabbage, 1/2 cup of chopped green onions, and if you’re using it, the 1/2 cup of cooked and chopped bacon or pork. Stir gently to mix everything without overworking the batter. You want those veggies to shine!
- Now, heat up a skillet over medium heat. I like to use a non-stick pan for easy flipping, but whatever you have will work. Lightly grease the skillet with a small amount of oil—just enough to prevent sticking. You don’t want it swimming in oil, just a thin layer to help the pancake get that beautiful golden crust.
- Once the skillet is hot, scoop about a cup of batter onto the skillet. Use the back of your spoon to shape it into a circle, about 6-8 inches wide. Don’t worry if it’s not perfect—imperfection is part of the charm!
- Cook the pancake for about 3-4 minutes. You’ll know it’s ready to flip when the bottom is golden brown and you see bubbles forming on the top. Use a spatula to carefully flip it over. This part can be a bit tricky, so don’t be afraid to use two spatulas if needed!
- After flipping, cook for another 3-4 minutes until the other side is just as golden. The pancake should be firm to the touch but still have a little give in the center. If you’re unsure, just lift it slightly to check the color!
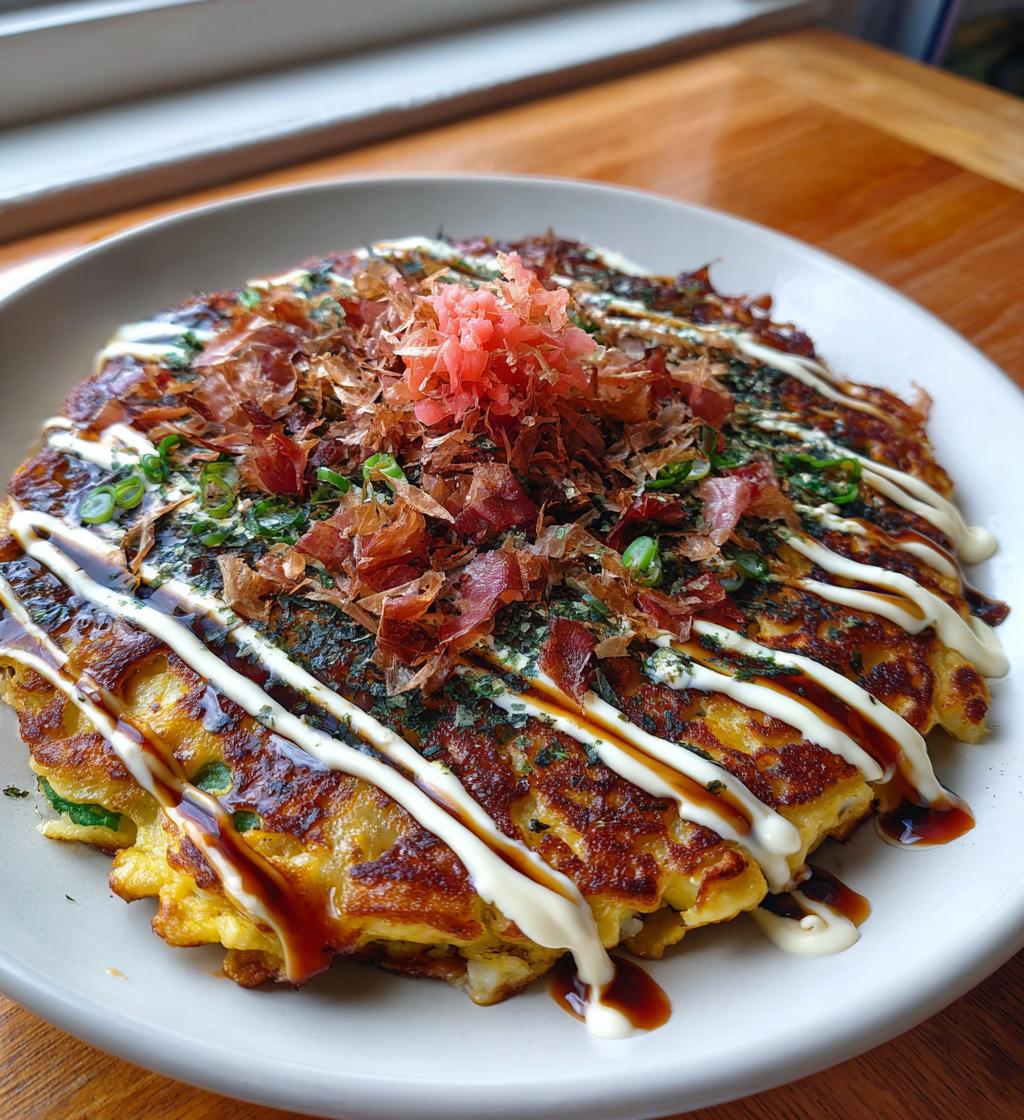
- Once cooked, transfer your Okonomiyaki to a plate and drizzle generously with okonomiyaki sauce and Japanese mayo. Don’t be shy! Top it off with bonito flakes and nori flakes for that authentic touch. Wow, just look at that!
And there you have it—your very own homemade Okonomiyaki! Serve it hot and enjoy every bite of this flavorful pancake. Trust me, once you start experimenting with toppings and fillings, you’ll be hooked!
Nutritional Information
Now, let’s talk about what’s in your delicious Okonomiyaki! Keep in mind that these nutritional values are estimates and can vary based on the specific ingredients you use, especially if you decide to customize your pancake with different fillings or toppings. Here’s a typical breakdown per serving (one pancake):
- Calories: 300
- Fat: 15g
- Saturated Fat: 4g
- Unsaturated Fat: 8g
- Trans Fat: 0g
- Cholesterol: 100mg
- Sodium: 500mg
- Carbohydrates: 35g
- Fiber: 3g
- Protein: 10g
- Sugar: 2g
Pretty good, right? With a good balance of carbs, protein, and some healthy fats, Okonomiyaki can make for a satisfying meal. Just remember, if you load up on toppings like extra mayo or meat, those numbers might change a bit. But hey, it’s all about enjoying every delicious bite!
Why You’ll Love This Recipe
- Quick Preparation: With just 30 minutes from start to finish, you can whip up a delicious Okonomiyaki for a weeknight dinner or a fun brunch!
- Easy Customization: The beauty of Okonomiyaki is that you can tailor it to your taste! Whether you prefer it loaded with bacon, packed with veggies, or even a seafood twist, the choices are endless.
- Delicious Flavor: Each bite is a burst of savory goodness, with the perfect balance of crispy edges and a fluffy interior that will have you coming back for more.
- Vegetarian-Friendly: You can easily make a vegetarian version by skipping the meat and adding more of your favorite vegetables, making it a fantastic option for everyone at the table!
Trust me, once you try this recipe, it’ll become a go-to favorite in your kitchen!
Tips for Success
Alright, let’s make sure your Okonomiyaki turns out absolutely perfect! Here are some handy tips that I’ve picked up along the way to help you achieve that ideal texture and flavor:
- Get the Right Consistency: When mixing your batter, it should be thick yet pourable. If it’s too runny, your pancake won’t hold together. If it’s too thick, it won’t cook evenly. Aim for that sweet spot, and you’ll be golden!
- Use Fresh Ingredients: The fresher your veggies, the better your Okonomiyaki will taste. I love using super crisp cabbage and vibrant green onions. Freshness really does make a difference!
- Don’t Overmix: When you fold in the shredded cabbage and other ingredients, be gentle. Overmixing can lead to a tough pancake. You want those lovely veggies to stay intact and add texture!
- Patience is Key: When you’re cooking the pancakes, don’t rush the flipping! Let them cook until you see those bubbles forming on top and the bottom is golden brown. It’s tempting to flip too soon, but trust me, patience will pay off!
- Experiment with Fillings: Don’t be afraid to get creative! Try adding ingredients like kimchi for a spicy kick, or swap in different proteins like shrimp or tofu. The beauty of Okonomiyaki is that it’s all about what you love!
- Serve Immediately: Okonomiyaki is best enjoyed hot off the skillet. If you let it sit too long, it can lose that delightful texture. So, gather your loved ones and serve it right away for the best experience!
With these tips in your back pocket, you’re all set to whip up some fantastic Okonomiyaki! Enjoy the process and have fun with it!
Variations of Okonomiyaki
One of the best parts about Okonomiyaki is how versatile it is! You can truly make it your own with various ingredients and toppings. Here are a few fun variations to inspire your culinary creativity:
- Seafood Delight: Add some fresh shrimp, squid, or even octopus for a delicious seafood twist. It brings a whole new level of umami to the pancake!
- Veggie Explosion: Load it up with more veggies like bell peppers, mushrooms, or zucchini. You can even toss in some corn for a sweet crunch!
- Cheesy Goodness: Who doesn’t love cheese? Try mixing in some shredded cheese like mozzarella or incorporating a cheesy topping for a gooey finish.
- Spicy Kick: For those who love a bit of heat, add chopped jalapeños or a drizzle of spicy mayo on top. It’s a fantastic way to wake up your taste buds!
- Kimchi Fusion: Incorporate kimchi into the batter for a tangy, spicy flavor that contrasts beautifully with the savory pancake.
These variations can make your Okonomiyaki experience even more delightful, so don’t hesitate to experiment and find your favorite combinations!
Serving Suggestions
Now that you’ve crafted your delicious Okonomiyaki, let’s talk about what to serve alongside it! For a complete meal, consider pairing it with a refreshing side salad, like a simple cucumber salad dressed with rice vinegar and sesame oil. It adds a lovely crunch and brightness to balance the savory pancake.
If you’re in the mood for something heartier, a bowl of miso soup is a classic option that complements the flavors beautifully. And don’t forget a chilled Japanese beer or a light sake to sip alongside your meal—both are fantastic choices to enhance the experience. Enjoy your Okonomiyaki with these delightful pairings for a truly satisfying feast!
Storage & Reheating Instructions
Got some leftover Okonomiyaki? No worries! To store your delicious pancakes, let them cool completely first. Then, wrap each pancake tightly in plastic wrap or place them in an airtight container. They can be kept in the refrigerator for up to three days. If you want to save them for longer, they freeze beautifully! Just make sure to separate layers with parchment paper to prevent sticking, and they can last up to a month in the freezer.
When you’re ready to enjoy your leftover Okonomiyaki, the best way to reheat them is in a skillet over medium heat. This method helps revive that crispy texture you love. Just add a small drizzle of oil to the pan and heat for about 3-4 minutes on each side until warmed through. You can also pop them in the toaster oven for a quick reheat. Trust me, they’ll taste almost as good as fresh!
FAQ Section
Q1. What’s the difference between Okonomiyaki and other savory pancakes?
Okonomiyaki stands out because it’s customizable, allowing you to choose your favorite fillings and toppings. Unlike other savory pancakes, which often have a fixed recipe, Okonomiyaki literally means “grilled as you like it,” making it a personal culinary experience!
Q2. Can I make a gluten-free version of Okonomiyaki?
Absolutely! You can substitute the all-purpose flour with a gluten-free flour blend. Just make sure to check the consistency of the batter, as some gluten-free flours may absorb more liquid than regular flour.
Q3. What other toppings can I use?
The sky’s the limit! Besides the traditional bonito flakes and nori, you can explore toppings like pickled ginger, sesame seeds, or even a sprinkle of cheese. Feel free to get creative with your favorite condiments, too!
Q4. Can Okonomiyaki be made in advance?
While it’s best served fresh, you can prepare the batter ahead of time and store it in the fridge for a day. Just remember to give it a good stir before cooking. Cooking the pancakes in advance is fine, too—just follow the storage and reheating instructions to keep them tasty!
Q5. What’s the best way to serve Okonomiyaki?
Serve it hot off the skillet for the best experience! You can cut it into wedges and serve it as a main dish alongside a salad, miso soup, or even some sake or Japanese beer for a delightful meal. Enjoy the combination of flavors and textures!

Okonomiyaki: 7 Reasons to Love This Savory Pancake
Okonomiyaki is a savory Japanese pancake filled with various ingredients.
- Total Time: 30 minutes
- Yield: 4 servings 1x
Ingredients
- 2 cups all-purpose flour
- 1 1/2 cups dashi or water
- 2 large eggs
- 2 cups finely shredded cabbage
- 1/2 cup chopped green onions
- 1/2 cup cooked and chopped bacon or pork
- Okonomiyaki sauce
- Japanese mayo
- Bonito flakes
- Nori flakes
Instructions
- In a bowl, mix flour and dashi until smooth.
- Add eggs, cabbage, green onions, and meat. Stir to combine.
- Heat a skillet over medium heat and grease lightly.
- Scoop batter onto the skillet and shape into a circle.
- Cook for 3-4 minutes until the bottom is golden brown.
- Flip and cook for another 3-4 minutes.
- Drizzle with okonomiyaki sauce and mayo.
- Top with bonito flakes and nori flakes.
Notes
- Customize fillings as desired.
- Serve hot for best flavor.
- Experiment with different toppings.
- Prep Time: 15 minutes
- Cook Time: 15 minutes
- Category: Main Dish
- Method: Stovetop
- Cuisine: Japanese
- Diet: Vegetarian
Nutrition
- Serving Size: 1 pancake
- Calories: 300
- Sugar: 2g
- Sodium: 500mg
- Fat: 15g
- Saturated Fat: 4g
- Unsaturated Fat: 8g
- Trans Fat: 0g
- Carbohydrates: 35g
- Fiber: 3g
- Protein: 10g
- Cholesterol: 100mg
Keywords: Okonomiyaki, Japanese pancake, savory pancake, Asian cuisine