
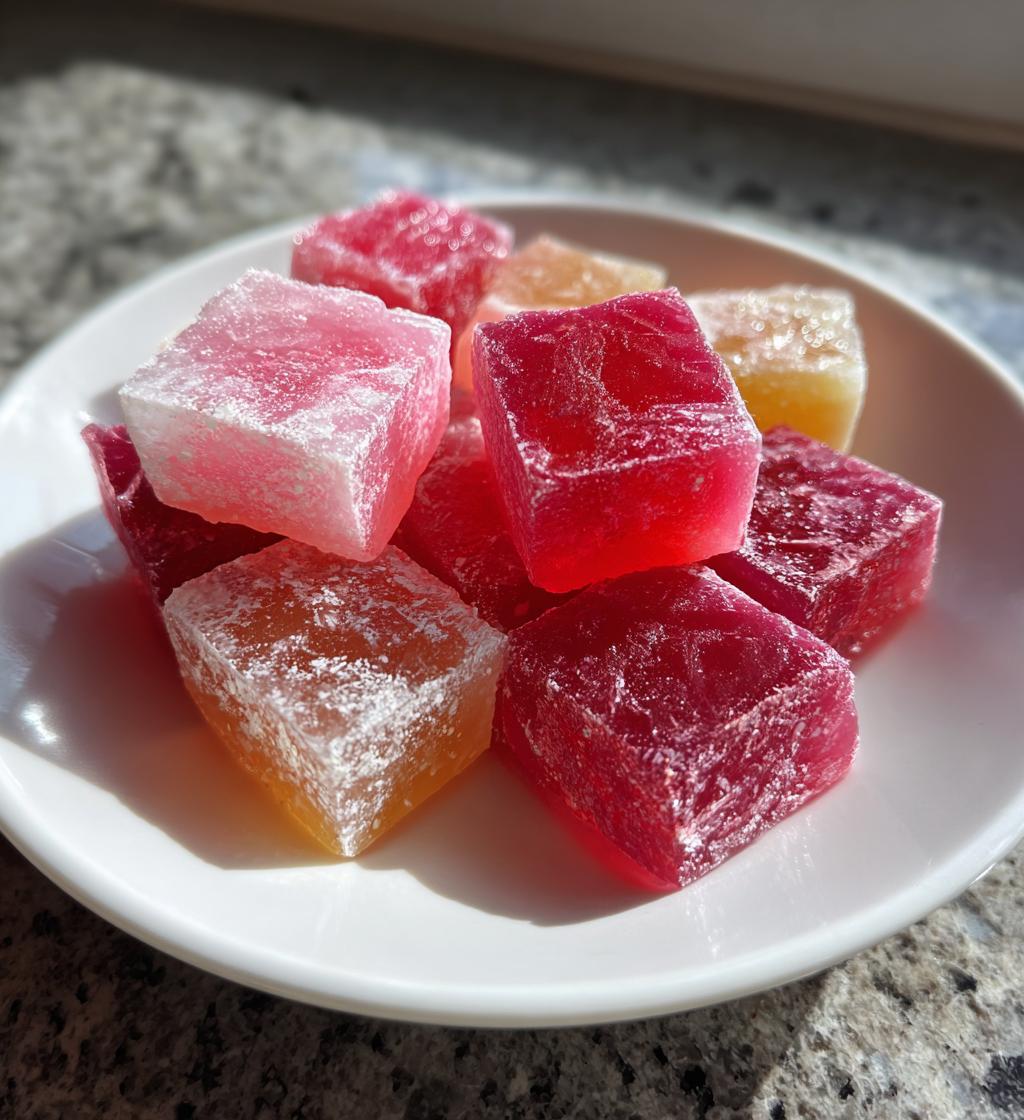
Ah, Valentine’s Day! It’s that magical time of year when love is in the air, and hearts abound. There’s something extra special about making your own valentines day candy to share with those you cherish. I mean, who wouldn’t melt at the thought of receiving a box filled with sweet, homemade treats? It’s a labor of love that shows just how much you care. Plus, nothing beats the satisfaction of creating something delightful from scratch!
Every time I whip up a batch of this candy, I can’t help but smile, remembering the first time I made it for my partner. The look on their face when they took that first bite was priceless! The beauty of homemade candy is that you can customize it to fit your loved one’s tastes. Whether you’re going for classic flavors or something a bit more adventurous, the possibilities are endless. So grab your apron, and let’s dive into the sweet world of candy-making, where every piece carries a sprinkle of your heart!
Ingredients List
Gathering the right ingredients is key to making the best valentines day candy. Here’s what you’ll need:
- 1 cup granulated sugar – This will be the base of your candy, providing that sweet goodness we all love!
- 1/2 cup corn syrup – This helps prevent the sugar from crystallizing and gives your candy that lovely chewy texture.
- 1/4 cup water – It’s essential for dissolving the sugar and creating that perfect syrup.
- 1/2 teaspoon vanilla extract – A dash of vanilla adds a warm, inviting flavor that elevates your candy.
- 1/4 teaspoon salt – Just a pinch to balance the sweetness and enhance the overall taste.
- Food coloring (optional) – If you want to make your candy visually stunning, feel free to add a few drops of your favorite colors!
Make sure you have everything prepped and ready before you start cooking. It makes the process so much smoother and more enjoyable! Trust me, nothing’s worse than scrambling to find an ingredient halfway through. So, let’s get everything together and get ready for some sweet magic in the kitchen!
How to Prepare Valentines Day Candy
Now that we’ve got our ingredients, it’s time to unleash our inner candy maker! Trust me, this process is as delightful as it sounds. Follow these steps carefully, and you’ll have your very own batch of beautiful valentines day candy in no time!
Step-by-Step Instructions
First things first, grab a medium-sized saucepan and combine the 1 cup of granulated sugar, 1/2 cup of corn syrup, and 1/4 cup of water. Give it a good stir to mix everything together, but don’t go crazy here – just a gentle mix will do!
Now, place the saucepan over medium heat. You’ll want to stir this mixture occasionally until all the sugar dissolves. This usually takes about 3-5 minutes. Keep an eye on it, and don’t let it boil yet! You want to ensure the sugar is completely gone before moving on.
Once the sugar has dissolved, it’s time to bring it to a boil. This is where the magic happens! Let it boil without stirring until the temperature reaches 300°F. I know it can be tempting to stir, but resist the urge! This will take about 10-15 minutes, so be patient. You’ll start to see some bubbles and that lovely syrupy texture developing. Just remember to keep an eye on it; candy can go from perfect to burnt pretty quickly!
When it hits 300°F, carefully remove the saucepan from the heat. This is where you’ll add your 1/2 teaspoon of vanilla extract and 1/4 teaspoon of salt. Give it a good stir to incorporate those flavors, and if you want to add some fun with food coloring, now’s your chance! A few drops will do, and you can mix it until you achieve your desired shade.
Next, prepare your mold! If you’re using candy molds, make sure they’re greased well. If you don’t have molds, a parchment-lined baking sheet works perfectly too. Pour the hot candy mixture carefully into your prepared molds or onto the baking sheet. Be cautious here; it’s hot and can splatter! Let it cool completely at room temperature – this will take about 30 minutes.
Once it’s fully cooled, you can break your candy into pieces. I love using a sharp knife or just my hands for this part. The satisfying crunch as you break it apart is the best! Make sure to store your delicious valentines day candy in an airtight container, and you’re all set to share your sweet creation with your loved ones!
Why You’ll Love This Recipe
- Quick and Easy: With just 10 minutes of prep and 15 minutes of cook time, you can whip up a delightful batch of valentines day candy in no time!
- Simple Ingredients: You probably already have most of the ingredients in your pantry, making this a convenient treat to create without a special trip to the store.
- Customizable: Add your favorite food colors or even mix in different flavor extracts to make this candy truly your own. The possibilities are endless!
- Perfect for Sharing: Pack these sweet treats in pretty boxes or wrap them in cellophane for heartfelt gifts. Everyone loves a little something homemade, especially on Valentine’s Day!
- Joy of Creation: There’s something incredibly satisfying about making candy from scratch. Each piece is infused with your love and creativity, making it perfect for those you cherish.
- Impress Your Loved Ones: Trust me, when they see you’ve made this candy yourself, they’ll be in awe. It’s a sweet gesture that says you care!
Tips for Success
Getting the perfect batch of valentines day candy is easier than you think, but there are a few important tips to keep in mind to ensure everything goes smoothly. Trust me, a little preparation can save you from common pitfalls!
First, make sure your saucepan is clean and dry before starting. Any moisture left in the pan can cause the sugar to crystallize, which is a big no-no for candy-making! You want that lovely smooth texture, so a spotless pan is essential.
Next, when you’re bringing your mixture to a boil, resist the urge to stir! I know it’s tempting, but stirring can introduce air and lead to crystallization. Just let it bubble away until it reaches that magical 300°F, and keep a close eye on it. Candy can change from perfect to burnt in the blink of an eye.
Also, use a candy thermometer if you have one! It takes the guesswork out of achieving the right temperature. If you don’t have one, you can also do the cold water test: drop a little of the syrup into cold water, and if it forms hard, brittle threads, you’re ready to go!
When it’s time to pour your candy mixture into molds or onto a baking sheet, be careful! That hot syrup can splatter and cause burns. I always recommend wearing an apron to protect yourself just in case, and use a heatproof spatula to help pour it out smoothly.
Lastly, let your candy cool completely before breaking it apart. It might be hard to resist the aroma wafting through your kitchen, but patience is key here. If you try to break it too soon, it may not set properly, and you’ll end up with a gooey mess instead of those perfect pieces you’re aiming for!
Follow these tips, and you’ll be well on your way to making delicious, beautiful valentines day candy that will impress everyone you share it with!
Variations
The beauty of making your own valentines day candy is the endless possibilities for creativity! Here are some fun variations to consider that can cater to different tastes and preferences:
- Flavor Infusions: Want to mix things up? Try adding different extracts when you stir in the vanilla. Almond extract can add a lovely nutty flavor, while peppermint extract offers a refreshing twist. Just a half teaspoon is usually enough to elevate your candy!
- Color Combinations: Get festive with your colors! Use red and pink food coloring for a classic Valentine’s vibe, or go wild with a rainbow of shades. You can even swirl colors together for a marbled effect – just drop different colors into the mold and gently swirl with a toothpick.
- Citrus Zest: For a zesty kick, add the zest of an orange or lemon to the mixture before it reaches the hard crack stage. This brings a fresh, citrusy brightness that pairs wonderfully with the sweetness of the candy.
- Nutty Delights: If you love a bit of crunch, fold in finely chopped nuts like pistachios or pecans just after you pour the mixture into the molds. They’ll add a delightful texture and flavor contrast.
- Chocolate Drizzle: Once your candy has cooled and set, consider drizzling some melted chocolate over the top for an extra indulgent treat. White chocolate, dark chocolate, or even a mix can make your candy look even more tempting!
- Spicy Kick: For those who enjoy a little heat, try adding a pinch of cayenne pepper or chili powder for a surprising twist. It’s an unexpected flavor that can really wow your taste buds!
These variations not only make your valentines day candy unique but also allow you to tailor them to your loved ones’ tastes. Get creative and have fun experimenting with flavors and colors that speak to your heart!
Storage & Reheating Instructions
Once you’ve made your delightful valentines day candy, you’ll want to store it properly to keep it fresh and tasty! Here’s how to do it:
First, let your candy cool completely before storing it. Once it’s cool, I recommend placing it in an airtight container. This will help maintain its sweetness and prevent any unwanted moisture from making it sticky. You can layer pieces of candy with parchment paper in between to avoid sticking together. Trust me, this little trick keeps everything looking pretty!
If you’ve made a large batch and want to keep it extra fresh, consider wrapping each piece in cellophane. It’s a great way to give them as gifts or keep them on hand for a sweet treat whenever you need one!
As for reheating, candy like this doesn’t really need it, but if you find yourself in a sticky situation with hard candy, you can carefully place it in the microwave for a few seconds. Just be cautious! Heat it in very short bursts to avoid melting it completely – a few seconds at a time should do the trick. You want it soft enough to enjoy but not gooey!
Follow these simple storage and reheating tips, and you’ll always have your homemade valentines day candy ready to share or savor at a moment’s notice!
Nutritional Information
When it comes to enjoying your homemade valentines day candy, it’s good to be aware of the nutritional values, even if they can vary based on the ingredients and brands you use. Here’s a general overview of what to expect per serving:
- Calories: 70
- Sugar: 15g
- Sodium: 10mg
- Fat: 0g
- Saturated Fat: 0g
- Unsaturated Fat: 0g
- Trans Fat: 0g
- Carbohydrates: 17g
- Fiber: 0g
- Protein: 0g
- Cholesterol: 0mg
Keep in mind that these values can fluctuate based on the exact ingredients you choose and the quantities you use, so consider this a general guideline! Enjoy indulging in your sweet creations while being mindful of your dietary preferences!
FAQ Section
Got questions about making your own valentines day candy? Don’t worry, I’ve got you covered! Here are some common queries and their answers to help you on your candy-making journey:
Q: How long can I store my homemade valentines day candy?
A: Your delicious valentines day candy can last for about 1-2 weeks when stored in an airtight container at room temperature. Just make sure it’s completely cooled before sealing it up! If you want to keep it fresh even longer, consider wrapping each piece in cellophane.
Q: Can I substitute corn syrup with something else?
A: Yes, you can! While corn syrup helps prevent crystallization, you can use honey or agave syrup as alternatives. Just keep in mind that the flavor and texture might vary slightly, but it can still be delicious!
Q: What if I don’t have a candy thermometer?
A: No worries! You can use the cold water test as a substitute. Just drop a bit of the hot syrup into a bowl of cold water. If it forms hard, brittle threads, you’ve reached the hard crack stage and are good to go!
Q: Can I add nuts or other mix-ins?
A: Absolutely! Once you pour the hot candy mixture into molds, you can fold in finely chopped nuts, dried fruits, or even chocolate chips. Just be sure to do this before it starts to set!
Q: How can I serve valentines day candy for a party?
A: Serving your homemade valentines day candy is easy and fun! You can arrange them in cute little boxes or on a decorative platter. For an extra touch, consider adding some heart-shaped decorations or a sprinkle of edible glitter to make it festive!
Q: Can I double the recipe?
A: Yes, you can double the recipe! Just make sure you have a large enough saucepan to handle the increased volume, and keep an eye on the cooking time, as it may take a bit longer to reach the right temperature.
If you have more questions or tips to share, feel free to leave a comment! I’d love to hear about your candy-making adventures!
Call to Action
I’d love to hear about your adventures in making this delightful valentines day candy! If you try out the recipe, please leave a comment below and share your thoughts. Did you add any creative twists or variations? How did your loved ones react to your sweet creations? Your feedback means the world to me!
Also, if you enjoyed this recipe, consider giving it a rating! It helps others find this little gem and spread the love of homemade candy. And don’t forget to share your candy-making journey on social media! Tag me in your photos and use the hashtag #MyCandyCreation, so we can all celebrate the sweetness together. I can’t wait to see what you create!
Happy candy-making, and may your Valentine’s Day be filled with love and lots of delicious treats!
Print
Valentines Day Candy: 7 Sweet Recipes to Melt Hearts
A sweet treat perfect for Valentine’s Day.
- Total Time: 25 minutes
- Yield: Approximately 20 pieces 1x
Ingredients
- 1 cup granulated sugar
- 1/2 cup corn syrup
- 1/4 cup water
- 1/2 teaspoon vanilla extract
- 1/4 teaspoon salt
- Food coloring (optional)
Instructions
- Combine sugar, corn syrup, and water in a saucepan.
- Cook over medium heat, stirring until sugar dissolves.
- Bring to a boil without stirring until it reaches 300°F (hard crack stage).
- Remove from heat and stir in vanilla and salt.
- If desired, add food coloring.
- Pour into a greased candy mold or onto a parchment-lined baking sheet.
- Let cool completely before breaking into pieces.
Notes
- Store in an airtight container.
- Can be wrapped in cellophane for gifts.
- Use different food colorings for variety.
- Prep Time: 10 minutes
- Cook Time: 15 minutes
- Category: Candy
- Method: Boiling
- Cuisine: American
- Diet: Vegetarian
Nutrition
- Serving Size: 1 piece
- Calories: 70
- Sugar: 15g
- Sodium: 10mg
- Fat: 0g
- Saturated Fat: 0g
- Unsaturated Fat: 0g
- Trans Fat: 0g
- Carbohydrates: 17g
- Fiber: 0g
- Protein: 0g
- Cholesterol: 0mg
Keywords: valentines day candy, homemade candy, sweet treats